


saltyvagabonds
Saltyvagabonds
Destinations

Asia
Bali
Japan
Korea
Malaysia
singapore
Thailand
Vietnam
Europe
Germany
France
U.K.
North America
Canada
Mexico
Oceania
Polynesia
Micronesia
Hawaii
Guam
Indonesia
All Travel Blogs
Travel Tips
Planning
About us
usa
Destinations
Travel Tips
Planning
About us
All Categories
Travel Tips
Worldschooling
Digital Nomad
Travel Hacking
Travel with kids
Lifestyle
Military Travel
Packing
All Travel Tips
Tech


Travel Hacking with
Chase Points
Military Space A Flights
Guide


Hiking in Bora Bora: Free Self-Guided Trails, Ridge Views, and When You Need a Guide
Bora Bora has free hikes most tourists never find and one of them ends at a 360-degree view of the entire lagoon. Here’s every trail I completed firsthand, the two you shouldn’t attempt alone, and the three local guides worth booking.

If you click on links we provide, we may receive compensation.


The Edit: This guide covers hiking in Bora Bora across every trail I’ve personally completed, including free self-guided ridge hikes, a WWII cannon trail, and technical summit routes with rope sections and 360-degree lagoon views. It includes firsthand trail stats, trailhead directions, difficulty ratings, and contact information for the island’s three most trusted hiking guides for the routes I didn’t attempt. Whether you’re looking for an easy jungle walk or a full-day summit challenge, this is the most complete hiking resource for Bora Bora you’ll find.

At a Glance
| Detail | Info |
|---|---|
| Number of Trails Covered | 5 |
| Firsthand Self-Guided Trails | 4 |
| Guide-Required Trails (not attempted) | 2 |
| Difficulty Range | Easy to Hard |
| Cost | Free to ~$100+ USD |
| Best Season | Dry season (May through October) |
| Recommended Gear | Trail shoes, 2L water, sunscreen, charged phone with AllTrails or Strava |
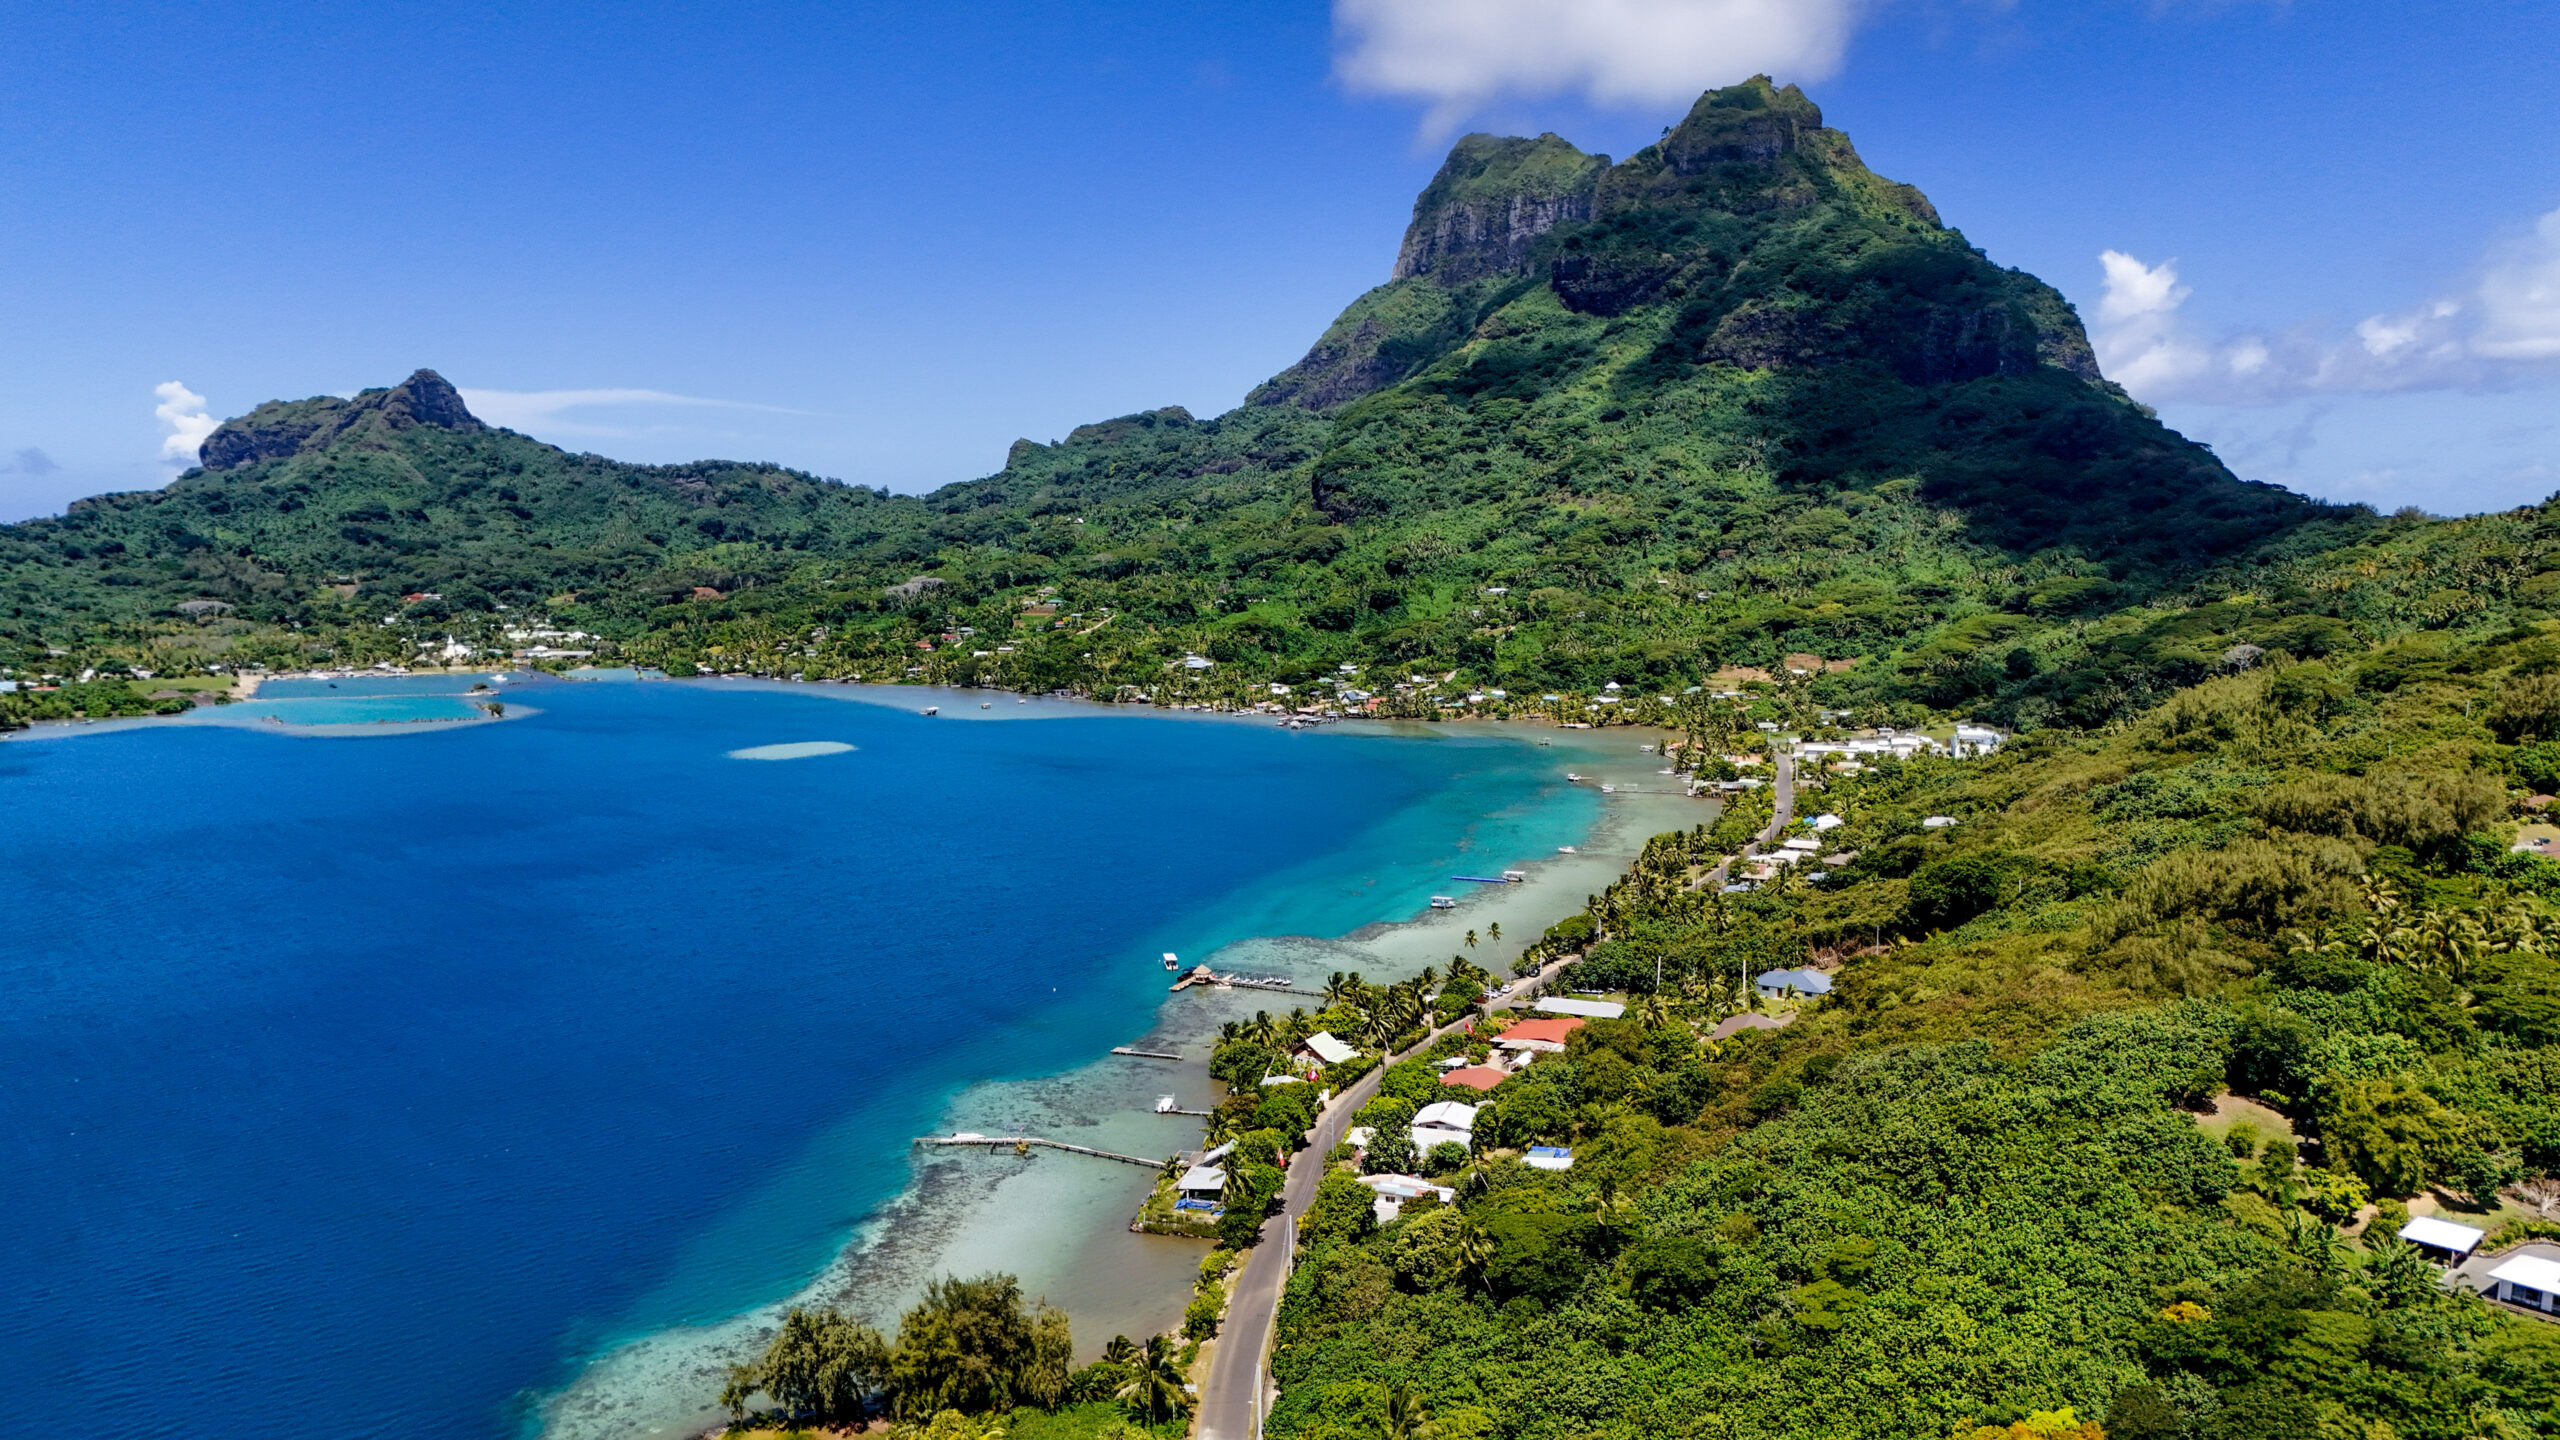
Nobody Told Me Bora Bora Had Hiking
Most people picture Bora Bora as a place where you float in an overwater bungalow and stare at a turquoise lagoon. That’s accurate. But about five minutes off the main road, the island turns into something completely different: dense jungle, volcanic rock ridgelines, rope-assisted scrambles, and views so wide you can see Raiatea, Taha’a, Maupiti, and the flat silhouette of Tupai sitting on the horizon.
I spent two months slow-traveling Bora Bora and ended up hiking more than I expected, mostly because I kept noticing roads that climbed into the hills and couldn’t help myself. This guide is everything I found, including the trails I’d do again, the ones that nearly broke me, and the two routes where you genuinely need a licensed guide before you even think about lacing up.
That last part isn’t a suggestion. There’s a government sign at the base of Mount Pahia and Mount Otemanu, posted in French, Tahitian, and English, that says people wishing to climb those peaks are strongly advised to go with a qualified tour guide. The sign has been there since 2008. I’ll cover all of it.

Self-Guided Hikes in Bora Bora
These four trails can be done without a guide. They range from easy to challenging, and all four are free. You’ll need a reliable map app (AllTrails or Strava both work), plenty of water, and the ability to navigate a few unmarked junctions. None of them have signage. That’s part of what makes them feel like a find.

The WWII Cannon Hike (Chemin des Cannons)
The easiest trail on the island and the most overlooked.
| Detail | Info |
|---|---|
| Distance | ~1 mile out and back |
| Elevation Gain | ~400 ft |
| Time | 20-30 minutes each way |
| Difficulty | Easy to Moderate |
| Cost | Free |
| Trail Type | Gravel road / ATV track |
| Best For | Families, first-time hikers, history lovers, budget travelers |
There are two WWII-era cannons sitting in the jungle above Bora Bora’s lagoon entrance, and almost nobody knows they’re there. They’ve been there since the 1940s. They’re free to visit. And the trail to reach them takes less than an hour.
The hike starts along the perimeter road at the Bora Bora Activity Center, a building most people drive past without a second look. The road leading up is easy to miss because it looks like a private driveway — because it is. The property belongs to the Activity Center, but hikers are welcome. Ask permission if anyone is around. The answer is always yes.
The climb up is straightforward: steep gravel, a switchback, volcanic rock, ATV-width road with jungle on both sides. About half a mile in there’s a three-way junction. Take the middle road. The left branch is where people get lost and it happens more than you’d think.
When you reach the cannons, each one is aimed at a different section of the lagoon. There’s a concrete WWII bunker nearby that most visitors miss entirely. The views from up here are quietly spectacular.
This is the most accessible hike on the island, genuinely great for families, and completely free. But there are a few things you need to know before heading up, including exactly where to park, what the junction looks like, and one warning the locals give every single person who asks about this trail.
Full trail guide: The Free Cannon Hike in Bora Bora Most Tourists Skip

Hiking Mount Mata Pupu
A short, sharp ridge hike with some of the best lagoon views on the island.
| Detail | Info |
|---|---|
| Distance | ~2 miles out and back |
| Elevation Gain | ~840 ft |
| Time | 1 to 1.5 hours |
| Difficulty | Moderate to Challenging |
| Cost | Free |
| Trail Type | Dirt road, forest trail, volcanic rock scramble |
| Best For | Solo hikers, fit travelers, photographers |
Most people spend their entire trip in Bora Bora looking up at the mountains. Mount Mata Pupu is where you go to look back down at everything.
The trailhead is roadside near Pofai Bay, easy to miss if you don’t know what you’re looking for. It starts up a steep gravel road that doubles as a cell tower service road, climbs to a ridge, and then pushes through dense tropical forest to a spire-like summit with open views in every direction. Matira Beach, the barrier reef, Mount Otemanu, and boats crossing the lagoon far below.
The trail has a volcanic rock scramble section with no rope and a tree root for a handhold, a narrow muddy ridgeline near the top, and a side trail to an east-facing overlook that most hikers skip. Don’t skip it.
It’s classified as moderate to challenging and I’d agree with that, but the bigger issue is the descent after rain. Wet volcanic rock on a steep ridge is genuinely dangerous, not just slippery-uncomfortable but the kind of slippery where you understand very quickly why people get hurt. I came down in the rain. It took full concentration the entire way.
If the weather is clear, this is one of the most rewarding two hours you’ll spend on the island. The full guide covers exactly where to park, what the route looks like, every navigation point, and what to expect on the scramble section.
Full trail guide: Hiking Mount Mata Pupu in Bora Bora

Hiking Arete de Matira
A lesser-known ridgeline above Matira Beach with almost no crowds.
| Detail | Info |
|---|---|
| Distance | 1.43 mi |
| Elevation Gain | 506 ft |
| Moving Time | 53 min |
| Total Time | ~1 to 1.5 hours |
| Difficulty | Moderate |
| Cost | Free |
| Trail Type | Ridge trail |
| Best For | Families, travelers staying near Matira, sunset chasers |
If you’re staying near Matira Beach, there’s a ridge directly above you that almost no one climbs. Arete de Matira is one of the least-written-about viewpoints on the entire island, which means the trail is yours. No tour groups. No crowds. Just jungle, a ridgeline, and a view of the lagoon that stops you cold.
The trailhead starts near a green electrical box close to Bloody Mary’s restaurant. You’ll pass fruit trees along the path, including pineapples and avocados growing right off the trail, and pandanus woven through the vegetation like it owns the place. The ridge delivers sweeping views of Matira Point, the outer reef, and the lagoon spread out below.
There’s a closure backstory to this trail that’s worth knowing before you go, and a specific window in the late afternoon that makes the timing of this one matter more than any other hike on the list.
The full guide covers the trailhead exactly, what the route looks like, the best time to go, and everything we noticed that isn’t written about anywhere else in English.
Full trail guide: Hiking Arete de Matira in Bora Bora

Hiking Mount Mataihua
The most rewarding self-guided hike on the island. Not for beginners.
| Detail | Info |
|---|---|
| Distance | 3.59 miles |
| Elevation Gain | 1,286 ft |
| Moving Time | 1 hr 48 min |
| Total Time | ~4 hours with breaks and summit time |
| Difficulty | Hard |
| Cost | Free |
| Trail Type | Village road, service road, rope sections, boulder scramble |
| Best For | Experienced hikers, drone photographers, people who want the best views on the island |
Two months on Bora Bora. Mount Mataihua had the best view of all of it.
This is not a casual hike. It involves real rope sections, a narrow traverse along a ridge feature that juts out like a cave wall, and a final push across an exposed grassy ridgeline to a summit at roughly 1,200 feet. I saw zero other hikers the entire day. The 360-degree view at the top covers the airport, the full lagoon, every motu, all the overwater bungalow resorts, Mount Otemanu, Mount Pahia, the ferry, the cargo pier, and the largest banyan tree area on the island. It’s everything, all at once.
Getting there requires navigating through Fa’anui village using landmarks that aren’t labeled on any map, including a water tank, a church, a school, and a power line service road. The 4-way ridge intersection about two thirds of the way up is where people go wrong, and there’s nobody up there to ask for directions.
Bring gloves. Rope burn on the descent is real and we learned that the hard way. This hike is not for beginners, not for anyone uncomfortable with heights, and not for anyone who doesn’t have a fully charged phone with offline maps downloaded before leaving the car.
For everyone else, the full guide has every navigation point, every landmark, every rope section, and exactly what to expect at the summit.
Full trail guide: Hiking Mount Mataihua in Bora Bora
Hikes That Require a Guide
I did not attempt these routes. I’m including them because readers will search for them and deserve accurate information, including the part that most posts leave out.
There is an official government sign at the base of Mount Pahia and Mount Otemanu, posted in French, Tahitian, and English since 2008. It reads: “People who wish to climb up Mount Pahia and Mount Otemanu are STRONGLY advised to go with a qualified tour guide.” The terrain involves dense jungle navigation, technical scrambling, and route-finding that can go wrong fast. Cell service is unreliable in the interior and there is no formal search and rescue infrastructure on the island.
I photographed that sign. I’m including it here because it matters.
Hire a guide. It’s worth every franc.
Mount Otemanu and Mount Pahia
These are the two iconic peaks that define Bora Bora’s skyline. Mount Otemanu reaches 2,385 feet and Mount Pahia sits at 2,169 feet. Both are visible from virtually everywhere on the island and from the water. Getting to their upper sections involves dense jungle, rope climbing, and route-finding that is genuinely dangerous without someone who knows the terrain.
The hike toward Mount Otemanu takes roughly 2.5 hours going up with a guide, with views of the surrounding motus, Taha’a, and Raiatea as you gain elevation. The route ends at the famous Mount Otemanu cave. Worth knowing before you go: the trail crosses private land, and if the landowners are home they will turn you around. A guide who knows the area and the people makes all the difference. Mount Pahia involves similar terrain and the same guide requirement.
For both, see the guide recommendations below.

Valley of the Kings
One of the most culturally significant hikes in all of French Polynesia, the Valley of the Kings winds through dense jungle past ancient burial sites of Bora Bora’s kings and the ruins of village settlements that date back centuries. The vegetation includes rare snake vines that store drinkable water, unique flora you won’t find anywhere else on the island, and the kind of jungle canopy that blocks out the sky.
Tried this one solo. Made it to the banyan tree and found part of the trail, but the Marae and the snake vines that make this hike worth doing? Never found them. The jungle interior is dense, there are no markers, and without a guide the most significant cultural sites are essentially invisible. That experience is exactly why this one is on the guided list.
This hike takes two to four hours and is considered moderate in terms of physical difficulty, but the interior navigation absolutely requires a guide. The cultural context alone makes having one worthwhile. Wandering through a place this historically significant without someone who understands its meaning would be a genuine miss.
Full trail guide: Hiking Valley of the Kings Bora Bora
The Guides Worth Booking
These are the three most trusted hiking guides on Bora Bora, all locally based, all contactable directly. Booking directly is always cheaper than going through your resort concierge, though most resorts can coordinate for you if you prefer.
Azdine Oualid — Polynesia Island Tours
If there’s a legend in Bora Bora hiking, it’s Azdine. Born in France to Moroccan parents, he arrived on the island with little more than a backpack and a machete and spent years doing something extraordinary: clearing jungle paths and uncovering ancient temples, tombs, and village sites that had been hidden for centuries.
His discoveries were significant enough that a TV crew flew in from Papeete to document them. He’s since guided guests sent by National Geographic, the New York Times, and even the Disney team that came to research the world of Moana.
Locals know him as “Tama,” a Polynesian word meaning “child who comes from far away.” It fits. He covers Mount Otemanu, Mount Pahia, and the Valley of the Kings, weaving archaeology, botany, Polynesian legend, and wild fruit foraging into a single experience. If you want to understand what you’re actually walking through, Azdine is your guide.
Phone: 29.66.60 or 67.56.02
Email: polynesiaislandtours@mail.pf
Available any day except Sunday. Dry season only. Book directly to save versus going through your hotel or resort agency.
Django Edwards — Bora Hiking Explorer
Django was named in National Geographic’s Best of the World 2024 for wellness experiences, recognized for leading what the publication called the first-ever guided hikes on Bora Bora. That’s not a small thing. His tours take guests through jungle trails, past WWII historical sites, and through landscapes fragrant with tropical flowers, with stops to sample fruit straight from the trees along the way.
What sets Django apart is the storytelling. In his own words: “My goal is not just walking. It’s also learning, sharing, having fun, and helping visitors better understand our Polynesian culture.” If you want a guide who treats the hike as a full cultural experience rather than just getting from point A to point B, Django is the one to call.
Facebook: Bora Hiking Explorer
Phone: 89 68 36 36
Wesley — Tahitian Hiking
Wesley is a passionate local guide with 1,000 followers on Facebook and a growing reputation in the Bora Bora travel community. His page describes his tours as a way to discover Bora Bora through its landscapes, culture, and traditions, led safely, with the goal of creating unforgettable memories. Reviewers consistently mention him by name as a trustworthy, knowledgeable guide who makes guests feel comfortable on the trail.
He’s a strong option for travelers who want a local, personal experience with someone who clearly loves what he does.
Phone: 89 26 68 11
WhatsApp: +689 89 26 68 11
Email: tahitianhiking@gmail.com
Facebook: Tahitian Hiking

What to Wear and Bring
The gear list for hiking in Bora Bora is short but non-negotiable. The heat and humidity here are not the same as hiking at home. The heat index regularly hits near 100 degrees Fahrenheit on exposed ridgelines, and the volcanic rock holds heat. Shade disappears quickly once you’re above the jungle canopy.
Bring at least two liters of water, more for anything rated difficult or above. Trail runners or hiking shoes with ankle support are the right call for anything beyond the Cannon Hike. Chacos or sandals can work on easier routes but you’ll feel every edge of the volcanic rock by the end. Gloves are worth throwing in a bag for any hike with rope sections. Sunscreen is essential. A fully charged phone with AllTrails or Strava downloaded before you leave your accommodation is not optional.
A change of clothes and a small towel in the car is something I learned to do after the first hike. You will be completely soaked by the time you get back down.
Best Time to Hike in Bora Bora
The dry season runs from May through October and is when hiking conditions are at their best. Trails are more stable, the heat is slightly more manageable, and the views from the ridgelines tend to be clearer.
The rainy season runs roughly November through April. Hiking is still possible during this period, but the volcanic rock becomes genuinely slippery when wet, and the jungle interior gets muddy fast. Trail conditions on the more technical routes like Mount Mataihua can change significantly after even a short rain.

Reading the Weather Like a Local
Here’s something most hiking guides won’t tell you: it rarely rains all day on Bora Bora unless a significant system is moving through. The island has a fascinating microclimate, and with a little weather awareness you can almost always find a window.
As a meteorologist I pay close attention to wind direction when planning a hike, and it makes a real difference. When the wind is out of the north, rain and clouds tend to build around Mount Otemanu and Mount Pahia first, and the town of Vaitape gets hit while the north side of the island stays dry. That’s actually your signal to head north. Mataihua, the traverse hike, and the Cannon Hike all sit on the north end and can be ideal in exactly those conditions. Conversely, when the middle and south end are getting hammered, the north side is often completely clear.
The rain typically moves through in bands rather than sitting over the whole island all day. If you check the weather the night before, watch the wind direction in the morning, and stay flexible with your start time, you can almost always get a hike in even during the wet season. Some of my best mornings on trail started under clouds that burned off within the first hour. More often than not the day started clear and beautiful, with clouds building up in the afternoon. Getting out early is the move.
If you’re not sure how to read the conditions, the safest rule is simple: clear sky overhead, go. Moving rain, wait it out.
More Bora Bora Hikes Worth Adding to Your List
- Hiking in Bora Bora: Free Self-Guided Trails, Ridge Views, and When You Need a Guide
- Valley of the Kings Bora Bora: Finding the Sacred Banyan Tree Solo
- Mount Mataihua Hike Bora Bora: The Rope-Assisted Ridge Climb Most Visitors Never Attempt
- The WWII Guns at Faanui: Bora Bora’s Free Cannon Hike Most Tourists Skip
- Hiking Mount Mata Pupu in Bora Bora: A Short Ridge Hike With Incredible Lagoon Views
- Hiking Arete de Matira in Bora Bora: A Family Friendly Ridge With Incredible Views
Frequently Asked Questions
Do I need hiking experience to hike in Bora Bora?
It depends on the trail. The Cannon Hike is accessible to almost anyone in reasonable health. Mount Mata Pupu requires some comfort with steep terrain and slippery rock. Mount Mataihua involves genuine technical climbing with rope sections and should only be attempted by experienced hikers. A guide is strongly recommended for Otemanu and Pahia regardless of experience level.
Are the self-guided hikes actually free?
Yes. All four self-guided trails we’ve covered have no entrance fee. The Cannon Hike is on private property but access is permitted. The others are on public land accessed from roadside trailheads.
Can I hike Mount Otemanu without a guide?
Technically there is no one stopping you, but the local government strongly advises against it in an official posted sign at the trailhead. Tourists have been injured and killed on this route. Hire a guide.
What app should I use for navigation?
AllTrails and Strava both work well. Download your maps offline before leaving your accommodation. Cell service is unreliable in the island interior.
Is hiking in Bora Bora worth it if I’m staying at a resort?
Absolutely. Getting off the resort property and up into the hills gives you a completely different perspective of the island. The views of the lagoon from the ridgelines are unlike anything you’ll see from sea level or from a boat. Most hikes can be completed in a half day, leaving the rest of the day for the beach or pool.
Can kids hike in Bora Bora?
The Cannon Hike and Arete de Matira are the most family-friendly options on the list. The Cannon Hike is an easy to moderate grade on a wide road, and Arete de Matira is short enough at 1.43 miles that older kids in reasonable shape can handle it. The more technical ridge hikes like Mata Pupu and Mataihua are not recommended for young children. The guided cultural tours with Azdine, Django, or Wesley may be suitable for older kids depending on the specific route, ask when you book.


Leave a Reply


Planning
Tips
Destinations
Oceania
North America
Europe
Asia
Bali
Japan
Korea
Malaysia
singapore
Thailand
Vietnam
France
U.K.
Germany
Canada
Mexico
usa
French Polynesia
Micronesia
Hawaii
Guam
Indonesia
All Travel Blogs
Destinations
Planning
Tips
Destinations
Travel Tips
Planning
About us
Hotels
via Booking.com


Car Rental
Book a Bus/Train/Transfer
Find Cheap Flights
Get ESIM or SIM Card
Easy Currency Exchange
Book Tours & Attractions
Get Travel Insurance
via Discover Cars
via Skyscanner
via 12Go
via Wise
via Viator
via Visitors Coverage
via SimOptions
Destinations
Planning
Tips
All Categories
Travel Tips
Worldschooling
Digital Nomad
Travel Hacking
Travel with kids
Lifestyle
Military Travel
Packing
All Travel Tips
Tech
