


saltyvagabonds
Saltyvagabonds
Destinations

Asia
Bali
Japan
Korea
Malaysia
singapore
Thailand
Vietnam
Europe
Germany
France
U.K.
North America
Canada
Mexico
Oceania
Polynesia
Micronesia
Hawaii
Guam
Indonesia
All Travel Blogs
Travel Tips
Planning
About us
usa
Destinations
Travel Tips
Planning
About us
All Categories
Travel Tips
Worldschooling
Digital Nomad
Travel Hacking
Travel with kids
Lifestyle
Military Travel
Packing
All Travel Tips
Tech


Travel Hacking with
Chase Points
Military Space A Flights
Guide


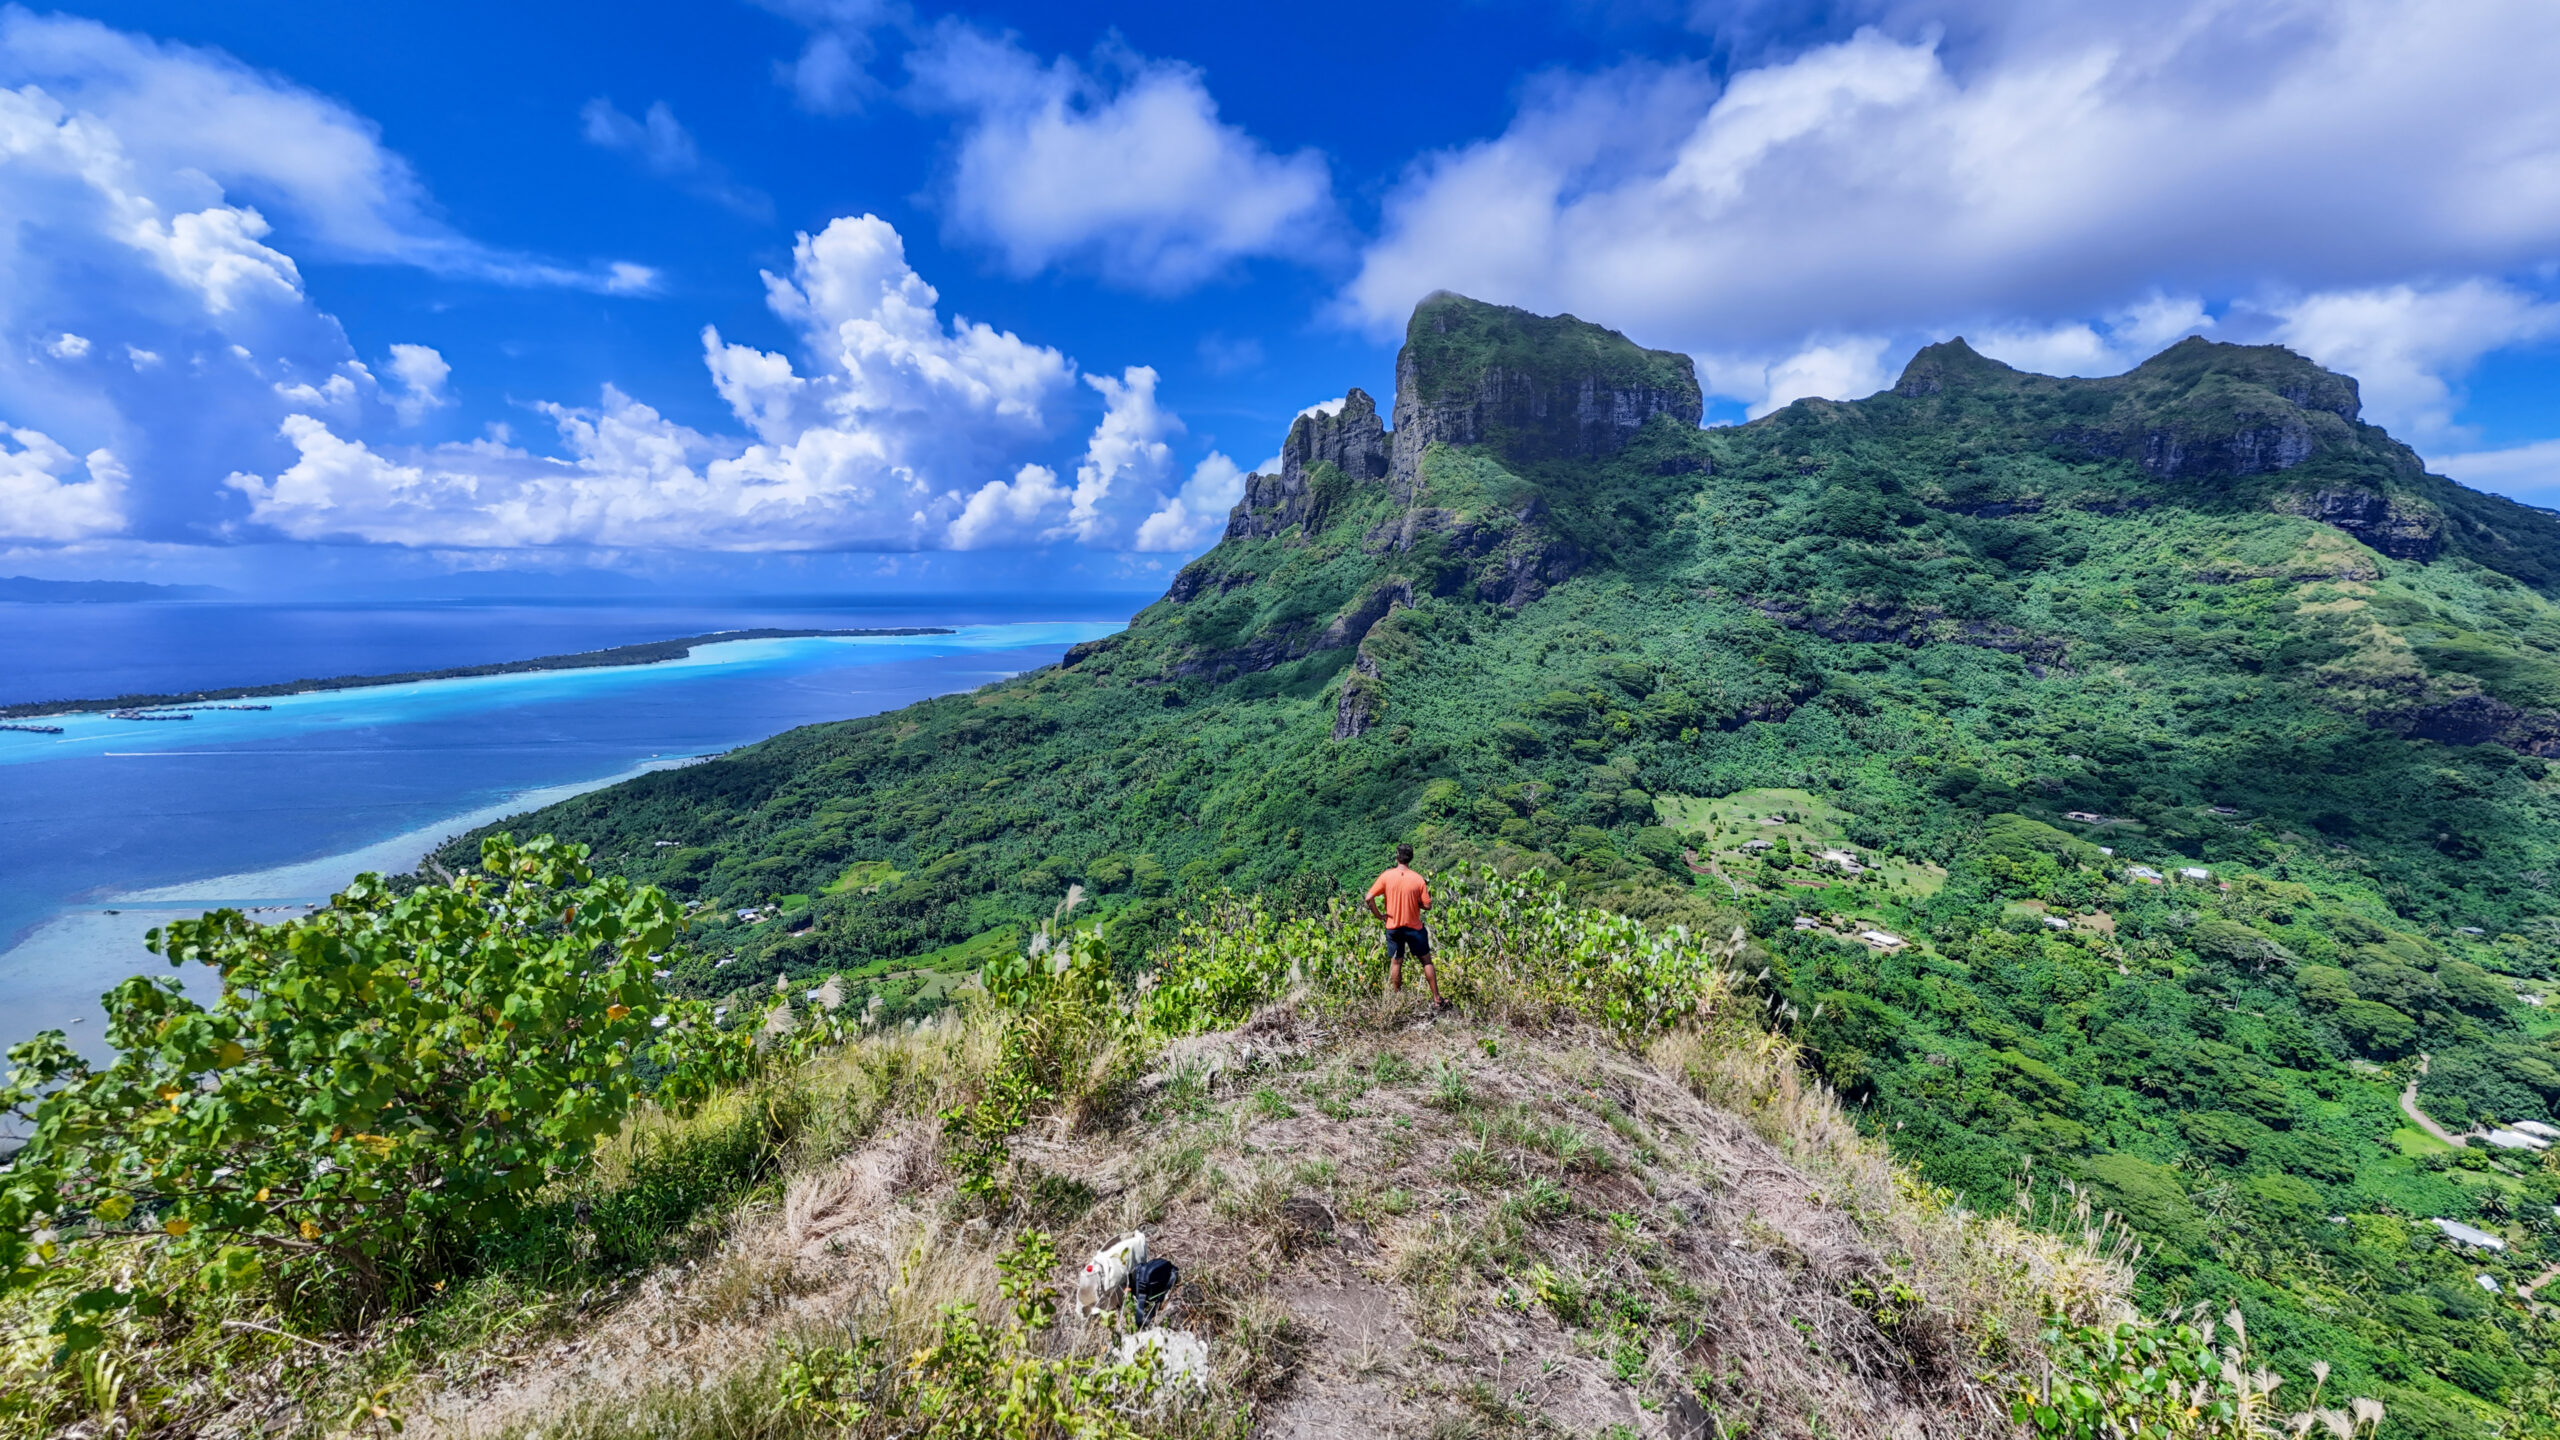

Mount Mataihua Hike Bora Bora: The Rope-Assisted Ridge Climb Most Visitors Never Attempt
Most people visit Bora Bora and never leave the resort. We drove this island 30+ times before spotting the ridge that became our hardest hike yet. This is Mount Mataihua, and the views from the top are worth every rope.

If you click on links we provide, we may receive compensation.


The Edit: This guide covers the Mount Mataihua hike in Bora Bora, including exact trailhead directions from Fa’anui village, navigation through multiple unmarked junctions, and what to expect from the rope-assisted technical climb to the summit. The hike covers 3.59 miles with 1,286 feet of elevation gain and takes roughly 4 hours total including time at the top. It is designed to help you decide whether this is a doable adventure or a technical climb that requires experience, comfort with heights, and solid footing.

We Found This Hike by Driving Around
We have driven the perimeter road of Bora Bora more times than I can count. Somewhere around the thirtieth loop, you stop following Google Maps and start chasing whatever catches your eye.
That is how Mount Mataihua happened.
There is a ridge on the north side of the island that pulls your attention every time you pass it. It is not Mount Otemanu or Mount Pahia. It does not have a tourist sign or a tour operator selling guided walks up it. It just sits there, steep and green and mostly ignored, looking like it would have an insane view from the top.
So I looked it up. And found almost nothing. A few Strava routes. AllTrails had 13 reviews. One French-language page on Decathlon Outdoor. Zero English blog posts that actually explain the route.
So I just went.
What to Expect Before You Start
This Is Not a Casual Hike
Let me be upfront about that right now. This hike has rope sections. It has exposed ridgeline. At one point you are basically climbing a ladder with roots and a rope instead of rungs. If you are not comfortable with heights, unfamiliar with using ropes, or just looking for a scenic walk, this is not the right hike.
It is also hot. I did this in mid-March and it was 85 degrees with humidity so thick the heat index was pushing 100. When I got back to the car, the thermometer read 40 degrees Celsius. Plan accordingly.
What I Packed
I kept it simple. Two 1.5-liter water bottles, one with electrolytes and one regular. My Fujifilm with an extra battery. The DJI drone with two fully charged batteries. A Leatherman. Sunscreen. Shorts and a t-shirt. Chaco sandals.
I also threw a towel and a change of clothes in the car because I sweat profusely and I was not about to drive home soaking wet.
One thing I did not bring that I wish I had: gloves. The rope sections on the descent will burn your palms if you are not careful. Add them to your pack.
On the wildlife front: no predators to worry about on Bora Bora. No snakes, no wild pigs like you find in the Marquesas. Just lizards, birds, wasps, mosquitoes, and a few dogs. Pants are not really necessary for this hike.
Hydrate Before You Leave
I made the mistake of under-hydrating on a previous hike and felt it badly by the three-quarter mark. This time I drank close to a full liter of water before leaving the house and ate a real breakfast. It made a significant difference. Do not skip this step.

How to Find the Mount Mataihua Trailhead
Getting to Fa’anui Village
Drive to Fa’anui on the north side of the island. On Google Maps, the roads in this area often do not have names. That is normal and it means you need to navigate by landmarks, not street names.
When you get into the village, look for a large parking area near a covered gym or indoor field structure. It looks like an open-air auditorium with a roof over it. The church is directly across from it, and there is a park nearby where a stream comes down from the hills. Park here. There is plenty of room.
A couple of guys were selling avocados near the lot when I arrived. A school bus was parked close by. You will know you are in the right spot.
Starting the Climb
From the parking lot, walk toward the church. It is about a block away and you can see it from where you park. Take a right and start heading uphill on the paved road.
You will pass a school almost immediately. There were police there helping direct traffic for school buses when I went through. I said hello in Tahitian and kept moving. Keep going up the hill. The road gets steep fast and you are basically already hiking before the trail even officially starts.
The houses along this stretch are more rustic than the Matira Beach side of the island. Bigger gardens, more fruit trees, way more papaya and banana cultivation. It has a different feel, more jungly and local.

Navigating the Route: The Three Key Decision Points
This is the section of the hike that will make or break your day. There is almost no trail signage and the junctions look confusing in person even if you have studied the map. Here is exactly what to look for.
Decision Point 1: The Water Tank
Keep hiking up the paved road until you reach a Y split with a water tank. There is a sign here that advises hikers heading toward Mount Pahia or Otemanu to bring a guide. This is good advice for those peaks. Mount Mataihua is a different route, but read the sign anyway.
At this split, you are taking the middle-left concrete road. In person it looks like three options: a dirt driveway on the left, a concrete road in the middle, and another dirt road to the right. The concrete middle road is your route. It will feel like you are going toward someone’s house. You are not. Keep going.

Decision Point 2: The Art Gallery Split
Continue up the concrete road, passing a few more homes, until you hit a second Y split. This one is less obvious than the first. There is no sign and it does not look like much of a trail in either direction.
If you keep going straight on the main road, you will end up at the Borbor Mason Art Gallery. That is not where you are going.
Take the left. You will cross a small concrete pipe bridge over a little creek. A bit further up, there is a guy working in his garden and I stopped to try to get a photo of him with Mount Pahia in the background.
That is when his dogs came out. They were friendly, jumped on me for a few seconds, then went back to the yard. No issue.


Decision Point 3: Follow the Power Lines
This is the part nobody explains and the part that made everything click for me.
After the garden and the bridge, keep looking for power lines cutting across the ridge above you. The electricity for this part of the island is generated on the eastern side and transmitted across via a line of concrete poles with one or two wires. Nothing like what you see in the US, just basic poles running up the hillside.
Once you spot them, you are following the “service road” underneath, its more like a service path. This takes you down slightly into a muddy valley with a small water crossing, then back up toward the ridge. It gets more rugged here. You are officially on a hike now.


The Ridge and What Comes After
The 4-Way Intersection
Eventually the service road brings you up to the crest of the crater ridge, where you will find a 4-way intersection. This is a major checkpoint.
From here you can see the other side of the island, the resorts, the overwater bungalows, and you start to feel close to Otemanu and Pahia. Someone planted coconut palms and banana palms near the intersection at some point. The views are already good. Take a break, drink some electrolytes, and look around.
You have been going uphill almost the entire way from the parking lot to this point. The navigation is mostly solved. From here you are heading north up the ridge toward the summit.

The First Rope Sections
Past the intersection, the trail starts easy enough through ironwood trees with wind whistling through the needles. Then it shifts. You hit the first rope section, a technical bit where the rope gives you something to hold while you step up through the rocks. Doable without it, but the rope helps.
You will do some boulder hopping, gain a viewpoint that feels like the summit and is not, and then duck back into the woods where the real climbing begins.

The False Summit
At a certain point you will push through some shrubs onto a small exposed viewpoint with almost no room to stand. The views are excellent. The space is tight. And you will think, okay, that must be it.
It is not it.
Turn around and look north. There is more mountain. Get back into the woods.

Where This Stops Being a Hike
The Cave Overhang Area
Past the false summit you will come to an area that feels like a canyon or cave overhang. Volcanic rock with an interesting basalt vein running through it, the kind of geological detail you only notice if you have spent time around volcanic terrain. People stop here to rest and build rock cairns.
There are ropes installed to help you get up through this section. Use them. The anchor points are small trees, not rock, and the older rope has been up there long enough to pick up some mildew and fraying. It is probably fine, but use both ropes when they overlap and do not put your full weight on one line if you can avoid it.

The Wall Traverse
After the cave area you will find yourself on a narrow path, maybe a foot and a half wide, traversing along the face of a rock wall with foliage on one side and nothing on the other. The ropes thin out here. You are just picking your way carefully around the wall until the route turns you back toward the summit approach.
The Final Climb
This is the part where it gets real.
There is a gap and then a steep rope climb. I would call it 65 to 80 degrees from vertical, so basically like climbing a very steep ladder. The ropes are anchored to small trees, maybe three or four inches in diameter. You are using roots as footholds, stepping on whatever the rock gives you, and pulling yourself up hand over hand.
If you slip here, it is serious. The exposure is real.
Amanda would not do this section. The kids would not do this section. I have been rock climbing since I was ten years old and I found it committing but manageable. Know your limits before you get here.
Also: if you are coming down this section without gloves, your palms will pay the price. I did not have gloves and I felt it. Learn from that.


The Exposed Grassy Ridge
Once you clear the final rope climb, the trail levels for a moment, a handrail rope guides you along the face, and then you pop out onto an exposed grassy ridgeline with full sun and no shade. The airport is visible to the northwest. The drop on the airport side is significant.
Aim for the lone coconut palm. Once you find it, you are thirty or forty feet from the top.
The Summit
The top is raw. Someone has cleared vegetation to open up a small standing area. There is one small tree for shade. A plastic planter pot was sitting there when I arrived, which tells you people do make it up.
There is also trash. Take yours with you when you leave. Carrying a plastic bottle up a 1,286-foot climb and then leaving it there is one of the more pointless things a person can do.
The views are full 360 degrees. Airport to the northwest, the entire lagoon spreading out in every shade of blue and green, reef line, motus, overwater bungalows from multiple resorts, Mount Otemanu and Pahia behind you to the south, boat traffic threading through the channels, the ferry arriving at the cargo pier.
I got a shot of an Air Moana plane taking off. I spotted what I think was the largest banyan tree in the island’s King Valley from up there.
I stayed about an hour. Burned through two drone batteries. Shot with the big camera. Sat in the heat and just looked at it.
You are at roughly 1,200 feet. The island is small. From up here, you can see almost all of it.


Trail Stats
| Stat | Details |
|---|---|
| Distance | 3.59 miles |
| Elevation Gain | 1,286 ft |
| Moving Time | 1:47:52 |
| Steps | 8,940 |
| Calories | 629 |
Is the Mount Mataihua Hike Worth It?
More worth it than Mount Mata Pupu in my opinion, and I have done that one multiple times. The views here are different. You are on the north side of the island looking back at the lagoon, the resorts, the mountain peaks, and the water all at once. The hike itself is more interesting, more varied, more demanding. I saw zero other hikers the entire day.
I would do it again.

Who Should Do This Hike
You should do this hike if you are comfortable on trails, have experience with rope sections or rock scrambling, are not afraid of exposure, and are okay with doing some genuine navigation through unmarked junctions.
If you want a challenging day with an exceptional payoff and you have the fitness and experience to back it up, this is one of the best things you can do on Bora Bora.

Who Should Not Do This Hike
Beginners. Anyone afraid of heights. People who are uncomfortable using ropes. Young kids. Anyone with ankle, knee, or joint issues. Anyone sensitive to heat.
The temperature at the trailhead level is already 85 degrees with serious humidity. The summit is fully exposed. The heat index on the day I went was close to 100 degrees Fahrenheit.
Going down is harder than going up on this one. The technical sections require you to down-climb with your full body weight on the rope and your feet searching for holds you could not really see going up. If you are not sure about that, turn around before the final climb.

| Quick Facts | Detail |
|---|---|
| Location | Bora Bora, French Polynesia |
| Trail Name | Mount Mataihua |
| Distance | 3.59 miles |
| Elevation Gain | 1,286 ft |
| Moving Time | 1:47:52 |
| Elapsed Time | ~4 hours with stops |
| Difficulty | Hard |
| Trail Type | Out and back |
| Trail Features | Ridge hiking, rope-assisted climbing, volcanic rock, exposed summit |
| Best Views | Full 360: lagoon, airport, resorts, Mount Otemanu, reef, motus |
| Parking | Large lot near covered gym/field in Fa’anui, across from church |
| Trail Access | Start from Fa’anui village, follow paved road uphill from church |
| Family Friendly | Not recommended for young kids or beginners |
| Trail Conditions | Hot, humid, exposed at summit. Muddy after rain. |
| Best Time to Go | Morning or dry weather |
More Bora Bora Hikes Worth Adding to Your List
- Hiking in Bora Bora: Free Self-Guided Trails, Ridge Views, and When You Need a Guide
- Valley of the Kings Bora Bora: Finding the Sacred Banyan Tree Solo
- Mount Mataihua Hike Bora Bora: The Rope-Assisted Ridge Climb Most Visitors Never Attempt
- The WWII Guns at Faanui: Bora Bora’s Free Cannon Hike Most Tourists Skip
- Hiking Mount Mata Pupu in Bora Bora: A Short Ridge Hike With Incredible Lagoon Views
- Hiking Arete de Matira in Bora Bora: A Family Friendly Ridge With Incredible Views
Frequently Asked Questions About Hiking Mount Mataihua
How hard is the Mount Mataihua hike?
It is hard. The first half is a steep uphill road walk through a village with some navigation required at unmarked junctions. The second half involves rope sections, boulder scrambling, a narrow wall traverse, and a near-vertical rope climb to the summit. If you have done technical hiking or rock scrambling before, you will be fine. If you have not, this is not the hike to start with.
Do you need a guide for Mount Mataihua?
No, but you need a GPS app. The trail has no signage and the junctions are genuinely confusing in person. Download the route on AllTrails or Strava before you leave and keep your phone charged. The signage at the water tank warns about guides for Pahia and Otemanu, not Mataihua specifically, but the principle applies: go prepared.
How long does the Mount Mataihua hike take?
Moving time is about 1 hour and 48 minutes. Total time including breaks and time at the summit is closer to 4 hours. Plan for a half day minimum, especially if you are bringing a camera or drone.
Is the Mount Mataihua hike safe?
It is safe if you are experienced and prepared. The final rope climb is steep and the exposure is real. The ropes are anchored to small trees, not fixed rock hardware, and the older rope has visible wear.
Use both when they overlap, do not rush, and if anything about the upper section makes you uncomfortable, the false summit viewpoint is a perfectly good place to turn around. There is no search and rescue infrastructure on Bora Bora.


Can kids do the Mount Mataihua hike?
Not recommended. The rope sections and exposed ridgeline require good upper body strength, solid footing, and comfort with heights. The heat alone is a serious factor for younger kids. If you are looking for a hike families can do together on Bora Bora, the Cannon hike is a better starting point and the Arete De Matira.
What is the best time of day to hike Mount Mataihua?
Morning. Start as early as you can to beat the heat. The summit is fully exposed and the heat index can push well past 100 degrees Fahrenheit by midday. Getting up and back before the hottest part of the day makes a real difference.
Is there parking at the Mount Mataihua trailhead?
Yes. There is a large lot near the covered gym and field in Fa’anui village, directly across from the church. It is not marked as trailhead parking but it is the right place to leave your car. Plenty of space.
What should I bring on the Mount Mataihua hike?
At minimum: at least 2 liters of water, one with electrolytes. Sunscreen. A phone with the route downloaded offline. A fully charged battery. Gloves if you have them. The rope sections will burn your palms on the descent without them. A change of clothes for the car is worth it if you sweat heavily.
Are there other hikes on Bora Bora?
Yes. Mount Mata Pupu is a shorter, less technical ridge hike on the south side of the island with great lagoon views above Matira Beach. The Arete de Matira is another option with solid views and less exposure.
The Cannon hike near the Bora Bora Activity Center is a free, easy-to-moderate walk to two WWII-era cannons overlooking the lagoon entrance. All four hikes are covered on Salty Vagabonds.


Leave a Reply


Planning
Tips
Destinations
Oceania
North America
Europe
Asia
Bali
Japan
Korea
Malaysia
singapore
Thailand
Vietnam
France
U.K.
Germany
Canada
Mexico
usa
French Polynesia
Micronesia
Hawaii
Guam
Indonesia
All Travel Blogs
Destinations
Planning
Tips
Destinations
Travel Tips
Planning
About us
Hotels
via Booking.com


Car Rental
Book a Bus/Train/Transfer
Find Cheap Flights
Get ESIM or SIM Card
Easy Currency Exchange
Book Tours & Attractions
Get Travel Insurance
via Discover Cars
via Skyscanner
via 12Go
via Wise
via Viator
via Visitors Coverage
via SimOptions
Destinations
Planning
Tips
All Categories
Travel Tips
Worldschooling
Digital Nomad
Travel Hacking
Travel with kids
Lifestyle
Military Travel
Packing
All Travel Tips
Tech
