


saltyvagabonds
Saltyvagabonds
Destinations

Asia
Bali
Japan
Korea
Malaysia
singapore
Thailand
Vietnam
Europe
Germany
France
U.K.
North America
Canada
Mexico
Oceania
Polynesia
Micronesia
Hawaii
Guam
Indonesia
All Travel Blogs
Travel Tips
Planning
About us
usa
Destinations
Travel Tips
Planning
About us
All Categories
Travel Tips
Worldschooling
Digital Nomad
Travel Hacking
Travel with kids
Lifestyle
Military Travel
Packing
All Travel Tips
Tech


Travel Hacking with
Chase Points
Military Space A Flights
Guide


Shinkansen Tokyo to Kyoto: Everything You Need to Know
Are you planning a trip from Tokyo to Kyoto? Our family-friendly guide makes taking the Shinkansen bullet train easy! Learn how to book tickets, navigate stations, and enjoy a smooth, stress-free ride with kids. Travel like a pro and make the most of your journey!

If you click on links we provide, we may receive compensation.


After spending a few days at the Hyatt Regency Tokyo Bay and soaking up the magic at Tokyo Disneyland, it was time to venture south before the snow arrived the following day.
If you’re trying to decide between the two parks, we break it all down in our Tokyo DisneySea vs Tokyo Disneyland guide so you can choose the experience that fits your trip best.

Over the past week in Tokyo, we had become very familiar with the rhythm of the city and the norms of the local train system, which made getting around feel surprisingly seamless and even enjoyable. By the time it was time to board the Shinkansen, navigating Tokyo Station felt far less intimidating than it did on day one.
Riding the bullet train in Japan is a must and has been on my list for years after learning they routinely travel close to 180 mph, making them one of the fastest high-speed rail systems in the world. We had a brief discussion about them in my aerodynamics class in college and how they are such a marvel. To help you navigate to Kyoto, we made this comprehensive guide.
Why You Should Chose The Tokaido Shinkansen
We decided to take the train instead of flying because it was cheaper and more convenient. Plane tickets from Haneda airport or Narita Airport to Kansai International Airport were either the same price or more expensive, and they didn’t even include baggage fees. Taking the bullet train allowed us to save money and avoid the hassle of airports.


Plus, when you factor in the time spent going through the checked baggage process and security at the airport, it takes about the same amount of time to reach your hotel by train. Not to mention, traveling by train offers beautiful views of the Japanese countryside that you wouldn’t see from the air.
Taking the bullet train allowed us to save money, avoid the hassle of airports, and enjoy some amazing scenery along the way.
Our Journey Starts with the Shinkansen Tokyo to Kyoto
We decided to take the bus shuttle from the Hyatt Regency Tokyo Bay to the nearest train station, Shin-Urayasu Station, which also services Disneyland. From there, we took the train straight into central Tokyo.
Suica Card is a Necessity
We used a digital card on our iPhones while visiting Japan to easily hop on and off the regular trains. This made our travels smooth and convenient, just like how everyone else does it.
Important to know: Suica cards work for local and commuter trains, but not for Shinkansen rides, which require a separate ticket.
Children aged 11 and under pay half the adult fare to ride commuter trains in Japan. Kids under 5 travel free when accompanied by one adult, but additional children beyond two per adult are charged the child rate. Infants travel for free unless they occupy a reserved seat, in which case they are also charged the child rate.


In the end, we purchased Audrey’s ticket at the kiosk after checking the map to ensure we bought it at the child rate. You can get a Suica card for your smaller children, but we were guided to use the kiosk and buy a child ticket instead.
Pro tip: This card is only usable for commuter trains. If you want a Suica card, you’ll need to get in line at the ticket counters where a staff member will assist you with the transaction thus defeating its convenience.
Tokyo Station and the Shinkansen Trains
Arriving at Tokyo Station for the first time can feel overwhelming and honestly, it kind of is. Roughly a million people pass through here every single day using local lines, subways, and the Shinkansen (bullet trains), so expect crowds, movement, and a lot of signage.
Navigating Tokyo Station with Kids
If you’re arriving via local trains or the Tokyo Metro, you’ll most likely be underground when you enter the station. This is totally normal. To find the bullet trains, look for signs clearly marked “Shinkansen” on the station maps and overhead navigation boards. These signs will guide you upward, usually via escalators or elevators, because Shinkansen platforms are boarded above ground, not underground.

After a bit of walking (and yes, Tokyo Station involves a lot of walking), we made our way up several escalators and eventually reached the Shinkansen ticket counters and gates.
Pro tip: When riding escalators with luggage, stand all the way to the left and keep your bags tight to your side. The right side is for people rushing past and they will rush.
We were initially unsure where to tap out and re-enter to make sure we were charged correctly for this leg of the trip. If this happens to you, don’t stress. Japan Railways has staff posted everywhere near the Shinkansen gates. Just walk up, show your ticket or IC card, and they’ll sort it out in seconds. They’re used to travelers navigating multiple train systems and are incredibly helpful.


Once you spot the Shinkansen signs and head up to ground level, the chaos starts to make sense and suddenly, you’re boarding one of the most efficient and iconic train systems in the world.
Helpful tip for navigating Japan:
Download Google Translate or Apple Translate before you go and make sure Japanese is available offline. The camera translation feature is especially useful for reading signs, ticket machines, and maps inside large stations like Tokyo Station. Even though most major signage is in English, having a translation app on hand adds a lot of confidence when traveling with kids.
Shinkansen Lines Ticket Counter
We tried asking the train line attendants at the next gate entrance and evaluated the ticket machines, but eventually, we just got in line to talk to a person. After about half an hour, we made it to a ticket agent.
She offered us seats in the ordinary cars, but I asked about the cost for the Green Car upgrade. It wasn’t much more and almost always guarantees bag storage above the seats and ensures a reserved seat.
The ticket counters accept various forms of payment, including Line Pay, Pay Pay, and credit cards. After we paid, we received our four individual tickets and a receipt.
Ordinary Cars
During my research, I found out that ordinary cars have non-reserved seats, meaning you might end up standing for your trip. Although the ticket agent assured us that we would be fine on the way to Kyoto, we were still skeptical about booking regular seats.
Ordinary cars are perfectly fine outside of peak travel days, but with kids and luggage, we personally preferred not to gamble.


We opted not to take the risk this time because we wanted a smooth transition to our hotel, and the day was still early. We wanted to be prepared in case things took a different turn and became complicated.
Green Cars
Green cars are akin to flying first class or business class. Your seat is reserved, there’s ample space for your bags, and the atmosphere is notably upscale. The Green Car seats are arranged two per side, similar to the seating configuration on a Boeing 737, whereas ordinary cars typically have three seats per side.
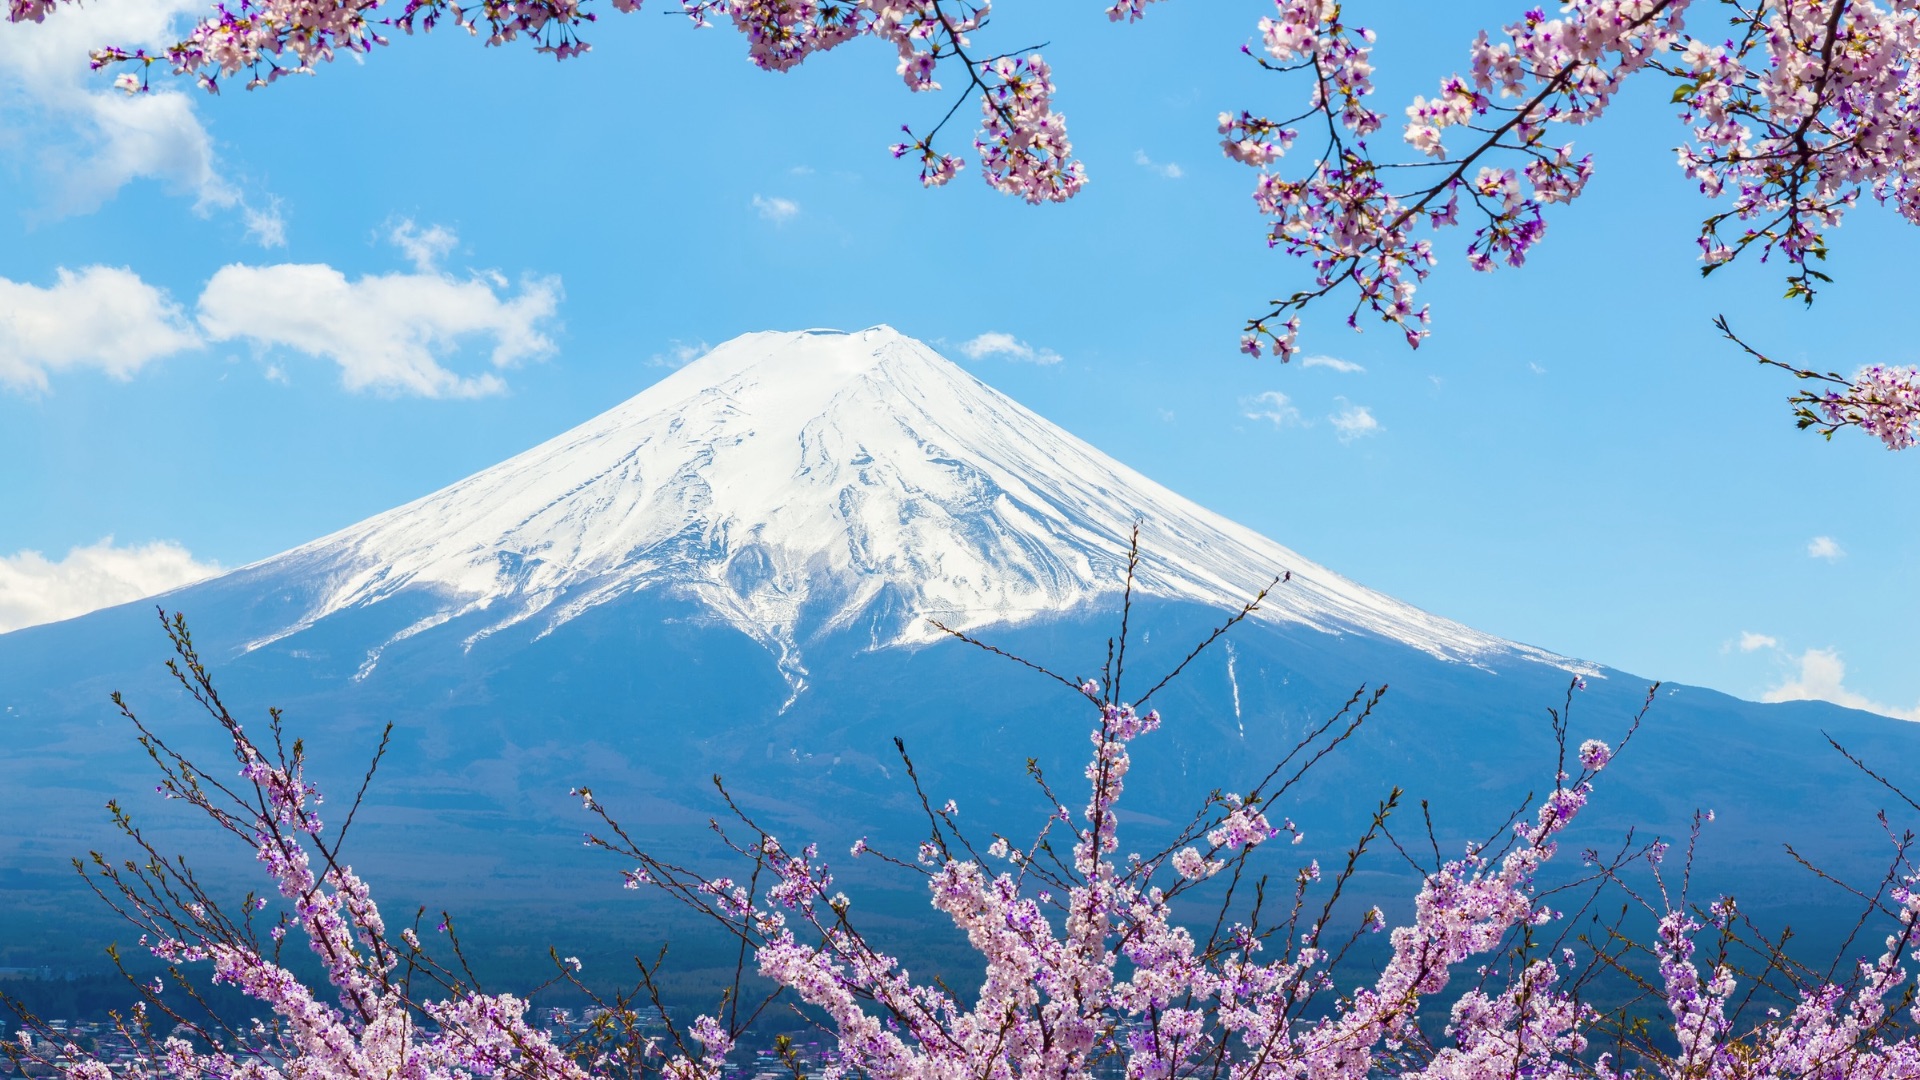
While booking our seats, we asked if it was possible to get a view of Mount Fuji. The ticket agent was happy to help and arranged all of our seats on the correct side of the train for the best chance of seeing it.
If you’re booking tickets yourself and want a Mount Fuji view, make sure you choose seats on the northern side of the Shinkansen. When traveling from Tokyo to Kyoto, this typically means selecting seats D or E (window side) on the train. Weather permitting, this side offers the iconic Fuji views as you pass through the Shizuoka area.
It’s not guaranteed, clouds are common, but sitting on the correct side gives you the best possible chance to spot Japan’s most famous peak without ever leaving your seat.
The seats can be rotated 180 degrees, allowing everyone to face each other, making it easy to chat as a group of four or play a card game.
Shinkansen Ticket Prices
Ticket prices vary depending on the train type, seat class, and time of travel. For three adults and one child, our Shinkansen tickets from Tokyo Station to Kyoto Station totaled 69,950 yen, or roughly $440 USD. We upgraded to Green Car seating, which cost an additional 4,470 yen per ticket, or about $30 USD, and was well worth it for the extra space and guaranteed seating.
Receiving Our Train Ticket
While purchasing our Shinkansen tickets, we asked if we could tap out using our Suica cards on our phones. Since we had arrived at Tokyo Station using local trains, we weren’t sure where or how to exit properly to avoid being charged incorrectly. The ticket staff assured us they could handle everything at the counter.
We tapped our phones right there, and they closed out that portion of the trip for us before issuing our Shinkansen tickets. After the transaction, we received our receipt and tickets and were good to go.
We had about 30 minutes before departure, and the agent directed us straight to the platform where the Nozomi trains would be boarding, which made navigating Tokyo Station feel far less intimidating than we expected.
Oversized luggage
When you have oversized luggage like a stroller, bicycle, snowboard, or musical instruments, a reservation isn’t required. The JR Central website here provides a great resource explaining that the rear seats can be reserved, or you can purchase a spot in the baggage compartment.


We traveled with a bag that measured 62 linear inches and weighed under 30 kilograms (66.2 pounds). It took two of us to get it into the overhead bin, but fortunately, we had no issues with fines, although we were a bit stressed before our trip.
All Aboard!
We used the restroom, though it’s not necessary if you’re traveling in the Green Cars as they have a small restroom for your convenience. Then, we went up one more escalator and arrived at the train platform.
We got to see the express trains for the first time. I noticed the difference in the long nose on some of the trains, which helps with aerodynamics and allows them to achieve faster speeds.
With the platform number confirmed, we stood by as rain came down, watching passengers exit before boarding. The doors don’t stay open long, which always brings a bit of anxiety after once seeing travelers left behind while trying to board a train in France.
Pro tip: Don’t worry about missing your train because a train arrives about every 3 to 20 minutes, just grab the next one. The system runs very efficiently and is super fast!
Mount Fuji Views from the Shinkansen
About an hour into the Shinkansen ride from Tokyo to Kyoto, the landscape opens up and Mount Fuji comes into view, if the clouds cooperate. Even partially covered, it’s still an unforgettable sight and easily one of the highlights of the journey.

Mount Fuji is the tallest mountain in Japan and holds deep cultural significance, so seeing it from the bullet train feels like a true “Japan moment.”
If you want the best chance at spotting Mount Fuji, seat selection matters:
- Ordinary (Standard) Cars: Choose Seats D or E
- Green Cars: Choose Seats C or D
These seats are on the northern (right) side of the train when traveling south from Tokyo to Kyoto, which is the side Mount Fuji appears on.
If you’re booking tickets at the counter, simply ask the agent for seats on the Mount Fuji side and they’ll usually know exactly what you mean. If you’re booking online, double-check the seat map before confirming your reservation.
Even if Fuji is shy that day, the ride itself is incredibly smooth and scenic, but when it does appear, it’s absolutely worth planning for.
Stops Along The Way
We made stops at Shin Yokohama and Nagoya city center stations, which allowed us to enjoy views of these major cities from the train, rather than just zipping by like a bullet.
The stops on the Tokaido Shinkansen line are only a few minutes long, providing a chance to stand up, stretch, and use the restroom without the train moving.
Kyoto Station
With the excitement of arriving in a new city, we got our bags down early and were ready to exit the train. Once off, we navigated through the train station, following the overhead signs to the exit.

Pro tip: Keep your one-way ticket handy because you’ll need it to exit the fare gates at Kyoto Station. Once we exited the fare gates, we found the JR ticket offices located just to our right.
The fare gate unexpectedly took our ticket, so we couldn’t keep it as a souvenir. Once the gates opened, we officially arrived at Kyoto Station. Here we would transfer to the commuter lines to reach our final destination.
Frequently Asked Questions When Using The Shinkansen
Can you travel from the Shinagawa Station on the Shinkansen?
As all major stations are accessible by the commuter lines the Japanese bullet train is accessible for use too.
Can Japan Rail Pass holders use the Shinkansen trains?
Yes! To use the Nozomi and Mizuho service may cost extra.
Does JR Railways have a museum?
They do have a museum called SCMAGLEV and Railway Park. It is located just minutes from the Nagoya Shinkansen station. Here you can look at the bullet trains up close along with trains not in use.
Do We Recommend The Shinkansen Tokyo to Kyoto and Final Tips?
We highly recommend taking the train because it’s seamlessly connected with all the commuter trains and public transport. The whole system works together like a well-oiled machine, making travel smooth and efficient.

I would avoid traveling on a Japanese holiday. We made this mistake on our way back from Kyoto to Tokyo, and it was much busier than usual. We opted for the Green cars again to guarantee a seat.
If you’ve traveled on the Shinkansen between Tokyo and Kyoto, leave us a comment below!


Planning
Tips
Destinations
Oceania
North America
Europe
Asia
Bali
Japan
Korea
Malaysia
singapore
Thailand
Vietnam
France
U.K.
Germany
Canada
Mexico
usa
French Polynesia
Micronesia
Hawaii
Guam
Indonesia
All Travel Blogs
Destinations
Planning
Tips
Destinations
Travel Tips
Planning
About us
Hotels
via Booking.com


Car Rental
Book a Bus/Train/Transfer
Find Cheap Flights
Get ESIM or SIM Card
Easy Currency Exchange
Book Tours & Attractions
Get Travel Insurance
via Discover Cars
via Skyscanner
via 12Go
via Wise
via Viator
via Visitors Coverage
via SimOptions
Destinations
Planning
Tips
All Categories
Travel Tips
Worldschooling
Digital Nomad
Travel Hacking
Travel with kids
Lifestyle
Military Travel
Packing
All Travel Tips
Tech
